How To Blur Images Easily in Minutes
Blur An Images – an imperative skill that every photographer, as well as digital artist, needs to have in their toolkit! Whether you want to create dreamy portraits or emphasize a particular subject, blurring pictures is a fantastic skill that can help you in any domain.
Keep on reading this article, as we have all your queries answered relating to how to blur part of an image online. By the end, we will also share some go-to tools to make the blurring process much easier and fun.
Before providing you with a comprehensive guide on how to blur an image in Photoshop, let’s first explore why blurring images has become a common practice nowadays.
The Need to Learn How to Blur Images Easily
As technology continues to advance, learning how to blur an image is becoming increasingly essential. In today’s visually-driven digital world, this skill has evolved from a creative choice to a practical necessity for the following reasons:
Privacy Protection and Anonymity
Our world has transformed into a global village, largely thanks to the various social media platforms. Billions of people regularly share their personal pictures on these platforms, often without realizing the potential consequences of their actions.
Preventing Misuse
- In an age where digital content can easily be manipulated, it’s crucial to learn how to blur an image to prevent misuse. Numerous surveys have revealed that approximately 22% of Americans have reported instances of their images being misused or abused online.
Focus on the Main Subject
- Now, it’s not necessary to learn how to blur an image in Photoshop, only to safeguard your privacy. Blurring can also be a powerful tool to impact your visual storytelling. All in all, it allows you to direct the viewer’s attention to the key elements of an image.
Creative Effect
- Apart from all the technical reasons, you can also learn how to blur part of an image online to give your images a creative edge. It allows you to experiment with artistic effects, transforming ordinary photos into captivating works of art. No matter you’re adding a dreamy backdrop or creating stunning bokeh, blurring techniques can breathe new life into your images.
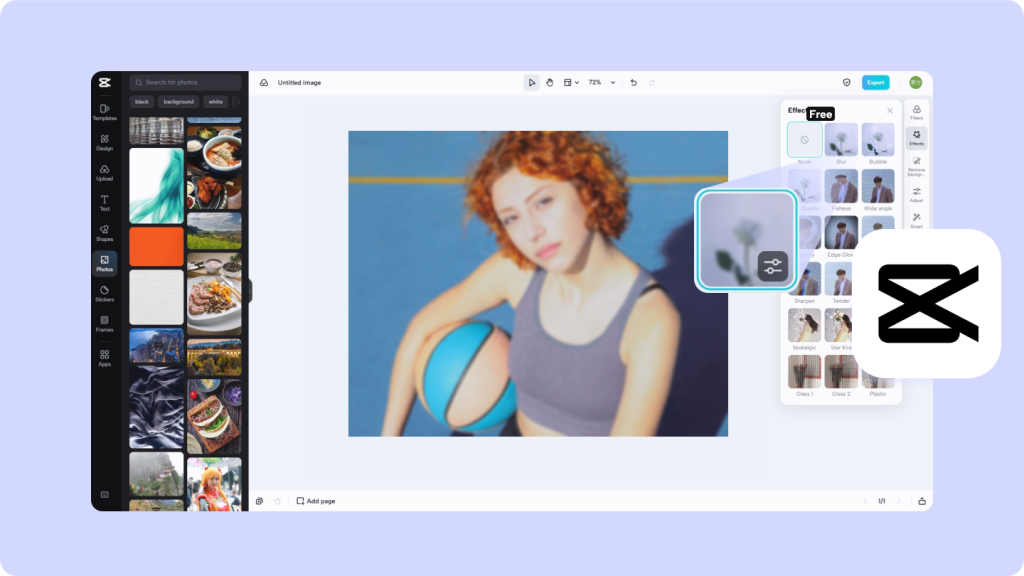
How to Blur An Images Using CapCut?
Up until this point, we’ve explored numerous compelling reasons why it’s essential to learn how to blur an image.
- Prepare Your Image and Upload

- The first and foremost step in how to blur an image on CapCut is to prepare your image. Ensure that the picture you intend to edit is readily available on the device you’ll use with CapCut.
- Blur Your Image
- Thankfully, CapCut offers several blurring options. If you want to learn how to blur an image entirely, you can start by applying a Gaussian Blur or similar effect. Later on, you can adjust the blur intensity as desired.
What Can the Blur An Images Tool be Applied to?
Now that we’ve discovered the blurring tool on CapCut and discovered how to blur an image using it, it’s time to take your skills to the next level. Let’s explore some quick techniques using this tool that will help your edits stand out from the crowd.
- Blur the Background
- Blurring the background effect can be useful for those of you who will pursue their careers as photographers. If you know how to blur part of an image, you can use the masking tool to create a soft, out-of-focus background that we commonly refer to as bokeh.
- This will make the subject of your image stand out. You can employ this technique for portraits or product photography, where you want to emphasize the main subject. Honestly, this is one of the amazing ways to keep the background visually pleasing yet subtle.
- Slightly Blurred to Add Artistic Whimsy
- If you know how to blur an image on CapCut, you can readily add an artistic touch to your pictures. For this, you need to apply a subtle blur effect to the photos you want to edit. This can help create a dreamy, ethereal atmosphere or soften the edges for a more enchanting look.
- It’s a versatile technique that can elevate your creative vision. You can also try playing with various intensities of blurs. However, it is recommended to start with the lowest intensity and then proceed with the highest as required. This will enhance your photo editing skills and elevate your creative endeavors.
This approach allows you to craft unique visuals that convey specific moods or stories, making your edits truly distinctive. Additionally, you can also employ this technique while crafting digital content.
How to Blur an Image on Your iPhone?
Blurring an image on an iPhone is a straightforward process, and you can achieve it using various apps available on the App Store. Here’s a complete guide on how to blur an image on an iPhone:
- Download an Image Blurring App
- Visit the App Store on your iPhone and search for an image-blurring app of your choice. One popular option includes “CapCut,” which you can download and install from the App Store.
- Import Your Image:
- As soon as you open the application, you can import an image from your iPhone’s photo library. Tap on this option to select the image you want to blur.
Finally, save the edited image to your iPhone’s photo library after applying the blur effect. Your blurred image is now ready for sharing on social media, using in projects, or incorporating into other creative endeavors.
Need More Image Editing Features? CapCut Can Help!
Hopefully, our guide on how to blur an image has helped you a lot to prepare the canvas you have been thinking of. However, blurring isn’t the only feature CapCut is offering. Instead, this captivating platform provides other tools like text overlays, advanced filters, collage makers, trimming, cropping, and much more!
Free Download >>> https://capcut-crack.pro/